Sculpting Hard Surface Assets: Weapons & Vehicles is a sophisticated art in the 3D modeling and game development industries. This craft involves creating detailed, realistic models from guns to cars, challenging artists to push the limits of digital tools. Mastering these skills is essential for anyone looking to excel in the production of high-quality, engaging content.
The secrets of Weapons & Vehicles – Hard Surface Sculpting are invaluable for achieving cutting-edge results. Key techniques include meticulous polygon management and advanced texturing methods. These secrets empower creators to bring their digital arsenals to life.
One major hurdle in Hard Surface Sculpting Secrets is the steep learning curve associated with technology and technique mastery. This challenge naturally ushers interested individuals toward The Basics of Hard Surface Sculpting, where foundational practices are thoroughly explored. Here, beginners can start their journey into sculpting mastery.
The Basics of Hard Surface Sculpting
Hard surface sculpting basics involve creating clean and precise geometric shapes, making them perfect for weapons and vehicles in digital art. Understanding the fundamental techniques is crucial for achieving realism and detail. Mastery of these basics allows artists to construct complex models with confidence.
To begin with hard surface sculpting basics, focus on the primary forms of your object. In the case of weapons or vehicles, this means starting with the largest shapes before adding smaller details. Keep your shapes sharp and your edges defined to capture that mechanical look.
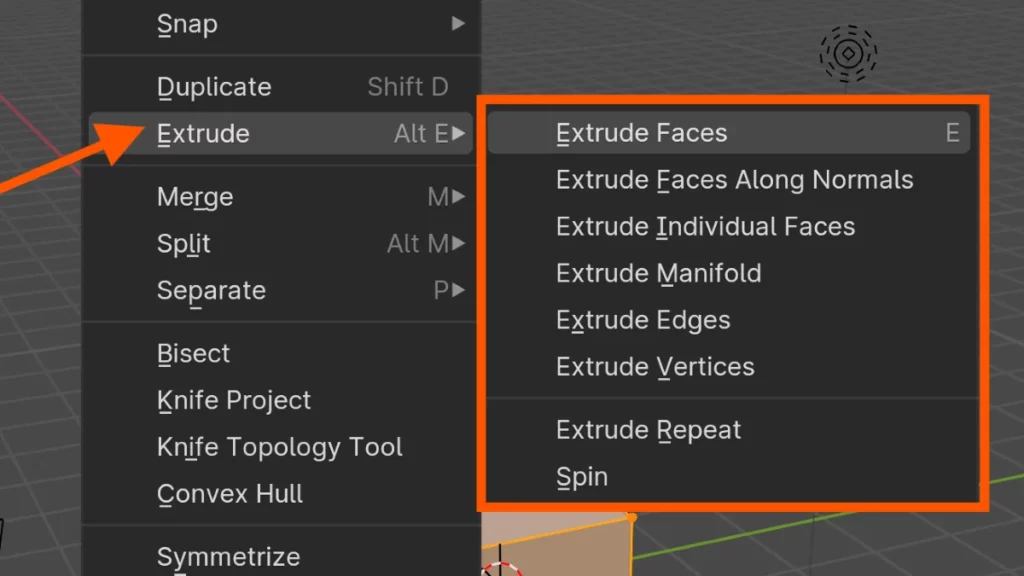
Artists must familiarize themselves with the essential tools for hard surface sculpting. Use the Extrude tool to pull out geometric features and the Inset tool for creating panel lines. Utilize the Ctrl + R shortcut to add edge loops, which helps refine the form and maintain edge crispness.
As you progress with hard surface sculpting basics, pay attention to topology. Good topology ensures that your model looks clean and behaves well under different lighting conditions. It also allows for smoother animation if your weapon or vehicle is part of a larger scene.
Remember, hard surface sculpting basics are not just about the tools but also about the techniques. For example, to join two objects together, use the Ctrl + J shortcut. Navigate to the Object menu to find the join tool when you need to merge separate parts into one mesh.
By keeping these hard surface sculpting basics in mind, artists can elevate their weapons and vehicles to new heights of realism. With practice, you can turn simple shapes into intricate works of art that stand out in any digital environment. The next section will delve into advanced tips for refining your hard surface models.
Techniques for Sculpting Realistic Weapons
When sculpting realistic weapons, there are several key techniques to keep in mind to achieve a lifelike and detailed result. Here are some essential tips for sculpting weapons with precision and accuracy:
1. Reference Images: Before starting your sculpt, gather reference images of the weapon you are looking to recreate. This will help you understand the intricate details and proportions of the weapon, ensuring your sculpt looks authentic.
2. Blocking Out Shapes: Start by blocking out the basic shapes of the weapon using simple geometric forms. This will help you establish the overall silhouette and proportions of the weapon before moving on to finer details.
3. Using the Clay Build-Up Brush: The Clay Build-Up brush is a versatile tool for sculpting weapons, allowing you to add volume and shape to your model. Use this brush to build up the layers of your weapon, focusing on one section at a time to maintain control over the sculpt.
4. Adding Surface Details: Once you have established the basic shapes of your weapon, focus on adding surface details such as grooves, engravings, and textures. Pay attention to how light interacts with the surface of the weapon to create realistic reflections and highlights.
5. Refining and Smoothing: After adding surface details, refine and smooth out the surfaces of your weapon using tools such as the Smooth brush. This will help eliminate any rough edges or imperfections, giving your sculpt a polished and professional finish.
By following these techniques for sculpting realistic weapons, you can create impressive and lifelike models that showcase your attention to detail and craftsmanship. Experiment with different brushes and tools to find the best approach for sculpting the specific weapon you are working on.
The Art of Vehicle Design in 3D Sculpting
Vehicle Design in 3D Sculpting begins with a strong conceptual foundation. Designers must envision the vehicle’s shape, function, and aesthetic appeal before crafting it digitally. This process involves sketching ideas and transferring them into 3D software, where the true sculpting begins.
Mastering the software tools is essential for efficient Vehicle Design in 3D Sculpting. Artists often use Blender or ZBrush for their robust sculpting capabilities. They start by blocking out the basic shapes using primitives, then refine these forms with tools like the Move Brush or the Clay Buildup Brush.
Detailing is where the design truly comes to life. To add intricate features, sculptors might use Subdivision Surface modifiers for smooth curves or Boolean operations for precise cutouts. Keyboard shortcuts like Ctrl + R to add edge loops speed up the workflow. As the vehicle’s model takes shape, designers focus on perfecting its contours and functionality, ensuring every part aligns with the initial concept.
In the next section, we will delve into the secrets of hard surface sculpting techniques that bring realism to vehicle models.
Advanced Texturing Techniques for Hard Surfaces
Mastering advanced texturing techniques for hard surfaces can elevate the realism of weapons and vehicles in any digital art project. Texture artists often start with basic color maps. They then layer on additional details to mimic real-world surfaces.
Creating realistic wear and tear on metal surfaces involves more than just adding scratches. Use a combination of albedo, specular, and normal maps to simulate depth and reflectivity. By adjusting these maps, you can suggest years of use or neglect.
To add rust, grime, or dirt, employ procedural texturing methods. These techniques allow for more control and can produce textures that react dynamically to the environment. Use software-specific functions like Substance Painter’s smart masks or the node editor in Blender to automate some of the processes.
Remember to pay attention to the smaller details. Bolts, screws, and seams should have their own textures to stand out. This level of detail contributes significantly to the overall realism. You can achieve this by sculpting high-resolution maps and baking them onto lower-poly models.
Make use of photoshop or similar software for touch-ups and fine-tuning. Blending photographic textures with hand-painted details can give you the best of both worlds. Use the clone stamp and layer masks to seamlessly integrate these elements.
Through these advanced texturing techniques for hard surfaces, artists can produce incredibly lifelike models. Texturing techniques for hard surfaces truly bring digital weapons and vehicles to life, making them a pivotal part of any 3D artist’s skill set. Now, let’s move forward and see how these texturing techniques can be applied to create dynamic lighting effects that further enhance the realism of hard surface models.
Tips for Optimizing Hard Surface Models for Rendering
| Tip Number | Optimization Tips for Hard Surface Models |
|---|---|
| 1 | Use clean topology |
| Ensure smooth shading and optimal rendering results by maintaining clean | |
| and organized topology. | |
| 2 | Utilize beveling |
| Bevel edges to create realistic and crisp details, experimenting with | |
| different settings to find the right balance. | |
| 3 | Add supporting edge loops |
| Define sharp edges and maintain shape during rendering by adding edge loops | |
| where needed. | |
| 4 | Consider subdivision |
| Subdivide models to improve smoothness and detail, adjusting levels to | |
| avoid excessive polygons. | |
| 5 | Utilize smoothing groups |
| Use smoothing groups in programs like 3ds Max to control light interaction | |
| and achieve more realistic shading and rendering. | |
| 6 | Experiment with materials |
| Change the look of models by trying different textures, shaders, and | |
| lighting setups. | |
| 7 | Test render frequently |
| Continuously test render to ensure the model meets your vision and make | |
| necessary adjustments. |
How to Add Intricate Details to Weapons and Vehicles
Adding details to weapons and vehicles in hard surface sculpting can elevate your models to a new level of realism. Begin by establishing a basic shape for your weapon or vehicle. Then, focus on enhancing the silhouette with additional components that suggest functionality.
Use the Subdivision Surface modifier to smooth your base model. After applying it, you can add edge loops to define sharper edges. Press Ctrl + R to add an edge loop and slide it into position for crisp details.
Next, incorporate smaller elements that tell a story about your weapon or vehicle. Adding bolts, seams, and panels can imply construction method and use. For these, the Boolean tool works well. Select the tool from the Modifier properties and choose your operation to cut or add shapes.
Textures and normal maps bring surfaces to life, suggesting wear, engraving, or branding. Use software like Substance Painter to paint these details directly onto your 3D model. Remember, adding details to weapons and vehicles isn’t just about what you add, but also where and how you apply these elements to support the overall design and function of your creation.
BEGIN LEARNING AND DEVELOPING WITH OUR BLENDER VIDEO SCHOOL!!
Check out our course library if you are looking for a systematic and effective way to improve your skills as a 3D artist. Click Here To Learn Blender The Right Way!