Retopology for Sculpting: Clean Meshes Made Easy is an essential process for digital artists and 3D modelers looking to refine their creations. By reworking the underlying geometry, artists can achieve models that are both visually stunning and technically sound. Proper retopology ensures that your sculpts are optimized for animation, rendering, and further detailing.
Retopology Made Easy – Clean Up Your Sculpts for Perfection focuses on simplifying the process. It provides efficient techniques to clean and enhance your digital sculptures. Achieve perfection in your 3D models with ease.
Yet, artists often face challenges in retopologizing complex shapes and intricate details. Overcoming these obstacles is crucial for high-quality models. Understanding the basics of retopology is the first step in conquering these difficulties and paving the way for mesh perfection.
Understanding the Basics of Retopology
Retopology refers to the process of rebuilding an existing 3D model with a new, more efficient, and cleaner topology. This is essential for models that will be used in animation, gaming, or any real-time application. The basics of retopology involve creating a new mesh that follows the form and features of the original sculpture, but with a controlled flow of polygons.
Understanding the basics of retopology starts with recognizing the importance of edge flow. Edge flow is the direction in which your mesh’s edges run, which should mimic the natural lines and contours of your model. It ensures that the mesh deforms properly during animation. To begin retopology, artists often use specialized tools available in 3D software to draw new topology over their sculpts.
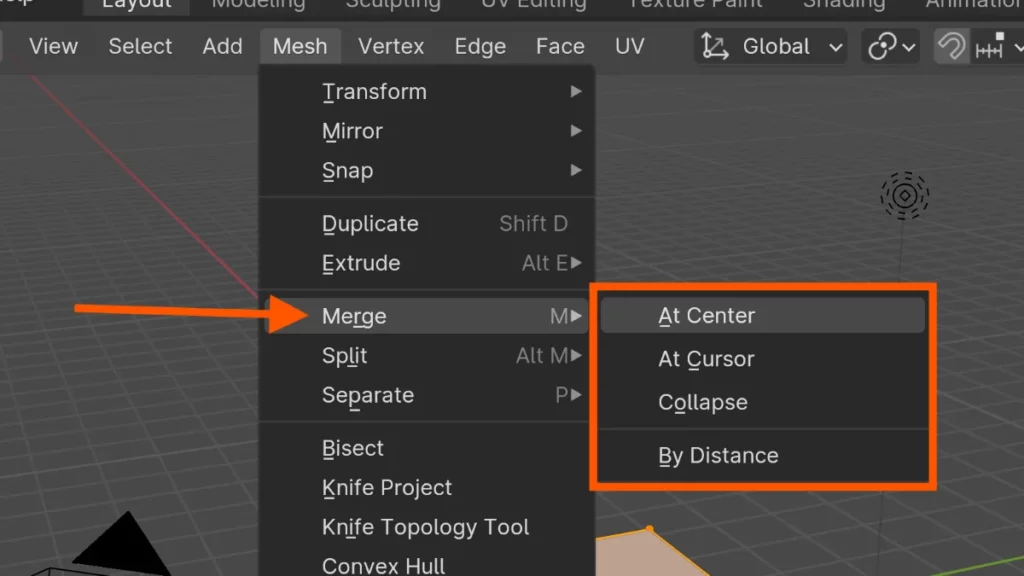
A key concept in the basics of retopology is the maintenance of quads, or four-sided polygons. Quads are preferred because they provide a uniform, grid-like topology and deform well under animation. Artists aim to avoid n-gons and triangles, which can cause issues during rigging and animation. To merge vertices and maintain quads, you can use the Alt + M shortcut in many 3D applications. Additionally, remember to frequently check your model by going to the Object menu to locate the smooth shading option, ensuring your mesh appears as intended.
The basics of retopology are the foundation for creating a model that not only looks good but also functions effectively in its intended environment. With a solid understanding of these principles, artists can ensure their models are optimized for performance without sacrificing detail. This understanding paves the way for exploring advanced retopology techniques and tools, which will be covered in the following section.
Essential Retopology Tools and How to Use Them
Retopology tools in Blender transform a complex, high-polygon model into a cleaner, more manageable version. The Shrinkwrap Modifier is a key tool for this process. It projects the new geometry onto the surface of the high-poly model, ensuring the new topology conforms accurately to the original shape.
Another essential feature is the RetopoFlow add-on, which streamlines the retopology workflow. It offers a suite of specialized tools like Contours and Polystrips that make edge-loop creation and polygon distribution much easier. To activate RetopoFlow, use the shortcut Ctrl + Alt + Shift + X, and watch as it simplifies the retopology process.
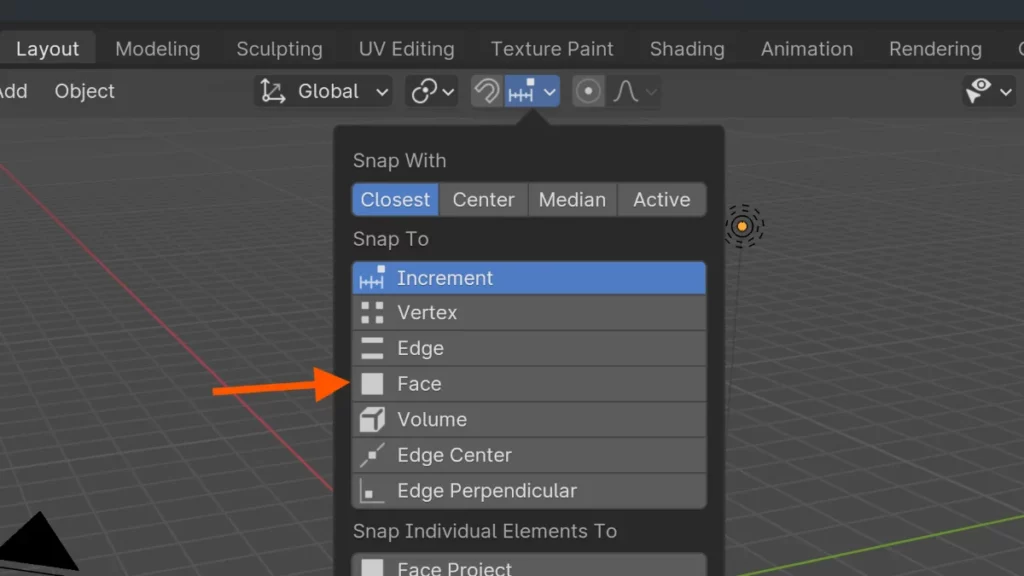
Blender’s Face Snapping mode is crucial for retopology. It enables vertices, edges, or faces to snap onto another mesh. Turn it on by hitting Shift + Tab and selecting ‘Face’ from the snapping options. This feature is invaluable for manually tweaking your topology to ensure it hugs the original mesh closely.
To efficiently use retopology tools in Blender, familiarize yourself with the Tweak and Extrude tools. These are found in the Tools Panel or accessed with G for moving vertices and E for extruding. These basic commands are the backbone of manual retopology, allowing for precise control over the new mesh’s form and flow.
As you master these retopology tools in Blender, your sculpting projects will take on a new level of professionalism. Clean topology is not only aesthetically pleasing but also essential for animation and game asset creation. With these tools and techniques, you’re now ready to dive into the nuances of edge flow and topology optimization.
Tips for Efficient Retopology Workflow
1. Start with a clean base mesh: Before beginning the retopology process, ensure that your sculpt is clean and free of any unnecessary details or irregularities. This will make it easier to create a new topology without any distractions.
2. Use retopology tools: Take advantage of retopology tools such as the Polydraw tool or the RetopoFlow add-on in Blender to help speed up the process and create clean topology quickly.
3. Keep it simple: When creating new topology, try to keep it as simple as possible. Avoid adding unnecessary loops or vertices that could complicate the mesh and make it harder to work with.
4. Follow the natural flow: Pay attention to the natural flow of your sculpt and use it as a guide when creating new topology. This will help improve the overall aesthetic of the model and make it easier to animate later on.
5. Use symmetry: If your sculpt is symmetrical, take advantage of symmetry tools to speed up the retopology process. This way, you only have to work on one side of the model and the changes will be mirrored on the other side automatically.
6. Check your topology: After creating the new topology, be sure to check it thoroughly for any errors or inconsistencies. Make sure edge loops are flowing correctly and all vertices are connected properly.
By following these tips, you can streamline your retopology workflow and achieve clean, professional results in less time.
Techniques for Cleaning Up Your Mesh
| Technique Number | Technique Description | Details |
|---|---|---|
| 1 | Use the retopology tool | Many 3D modeling software programs are equipped with retopology tools that allow you to overlay a new, cleaner topology on your existing sculpt. This helps reduce polygon count and optimize the mesh. |
| 2 | Manually adjust geometry | If automated retopology tools do not meet your needs, you can manually adjust the mesh geometry by moving, scaling, or deleting vertices, edges, and faces for complete control over the mesh’s final appearance. |
| 3 | Use the smooth tool | The smooth tool in 3D modeling software can even out rough or jagged surfaces on your mesh, helping to create a more uniform and polished appearance. |
| 4 | Check for overlapping geometry | It is crucial to check for and resolve any overlapping geometry in your mesh to prevent rendering issues and distortions. Tools like merge vertices or weld can be used to eliminate overlaps and ensure a clean, error-free mesh. |
| 5 | Optimize your topology | Aim to create a mesh topology that follows the natural contours of your sculpt while minimizing polygon count. Strategic vertex and edge connections can enhance both the visual appeal and performance of the mesh. |
By incorporating these techniques into your 3D modeling workflow, you can achieve a cleaner and more polished mesh for your sculpts. Taking the time to clean up your mesh will not only improve the overall aesthetics of your models but also make them easier to work with in future projects.
Optimizing Your Model’s Topology for Better Performance
Optimizing your model’s topology is essential for enhancing both the performance and the visual quality of your work. With topology optimization, you streamline the flow of polygons across your model. This makes it easier for rendering engines to process the model and for animators to work with it effectively.
A clean, optimized mesh also improves the model’s deformation during animation. By ensuring that edge loops follow the natural contours and muscles of the model, topology optimization can make your characters move more realistically. It’s critical to place more detail where it’s needed and less where it’s not.
To start optimizing, focus on reducing the polygon count without sacrificing detail. Use tools like the Decimate Modifier to simplify meshes. Remember, the goal of topology optimization is not just to decrease the number of polygons but to reorganize them for maximum efficiency.
When working on retopology, learning the right shortcuts can save you a significant amount of time. For instance, to merge vertices quickly, you can use Alt + M. This simple command keeps your workflow smooth and uninterrupted.
Having an efficient topology is not just about the technical aspects; it influences the aesthetic quality of your final sculpt. The cleaner the topology, the more accurate your textures and shadows will be, leading to a more professional and polished look.
As you refine your model’s topology, keep an eye on maintaining an even distribution of quads. Use the Polygon Reduction tool to help with this task. Remember that good topology is the foundation on which everything else is built.
Investing time in topology optimization at an early stage can lead to a more efficient and enjoyable creation process. With these strategies in hand, the next step is to dive into specific retopology tools and techniques that can help you achieve perfect topology.
Preparing Your Sculpt for Animation: Retopology Focus
Retopology for animation is not just a step in the process; it’s an art that ensures your digital sculptures come to life. Optimizing mesh topology is critical for deformations to look natural during animation. A well-retopologized model moves smoothly, allowing for more realistic and versatile animations.
Begin by analyzing your sculpt’s flow of geometry. Identify areas that require extra flexibility, like joints and facial features. Ensuring these parts have the right edge flow will enhance their movement, making retopology for animation crucial.
Use tools specifically designed for retopology within your chosen software. Activate the quad draw tool with shortcuts like Shift + Right Click to redraw your mesh. Pay attention to creating quads, as they deform more predictably than triangles or n-gons during animation.
The animation rig’s requirements will dictate retopology efforts. Focus on creating loops around eyes and mouths for expressive character animation. Streamline your work using the symmetry function, which can be toggled on with a shortcut like Shift + S.
Spend time refining your topology in areas that will experience significant movement. This step is fundamental for achieving a professional result in animation. Remember, retopology for animation not only makes your model look good but also functional.
Keep your vertices evenly distributed and watch out for the density of your mesh. Toggle to wireframe view with Z to check for consistency. A uniform topology ensures that skinning and weight painting, which later influence animation, proceed without issues.
BEGIN LEARNING AND DEVELOPING WITH OUR BLENDER VIDEO SCHOOL!!
Check out our course library if you are looking for a systematic and effective way to improve your skills as a 3D artist. Click Here To Learn Blender The Right Way!