Optimizing sculpts for 3D printing requires meticulous attention to detail in both resolution and supports structure. Achieving print-perfect sculpts is a balancing act between aesthetic precision and structural integrity. Mastering resolution and support settings is crucial for any 3D printing enthusiast or professional looking to produce top-quality models.
Print-perfect sculpts are the outcome of optimal resolution coupled with carefully designed supports. This process ensures fine details emerge crisp while maintaining the model’s stability during printing.
One primary challenge in achieving print-perfect sculpts is preventing features from being obscured by supports or blurred by inadequate resolution. This leads us to a pivotal discussion in maximizing detail: how to optimize sculpt resolution for 3D printing effectively.
Maximizing Detail: How to Optimize Sculpt Resolution for 3D Printing
Optimizing sculpt resolution is crucial for achieving the finest detail in 3D prints. Start by assessing your model’s complexity and the capabilities of your 3D printer. Choose a resolution that your printer can handle while maintaining the intricacies of your design.
Increase your model’s resolution within your sculpting software. Navigate to the mesh settings and adjust the detail level. Remember, higher resolution means more polygons, which can capture finer details for your print.
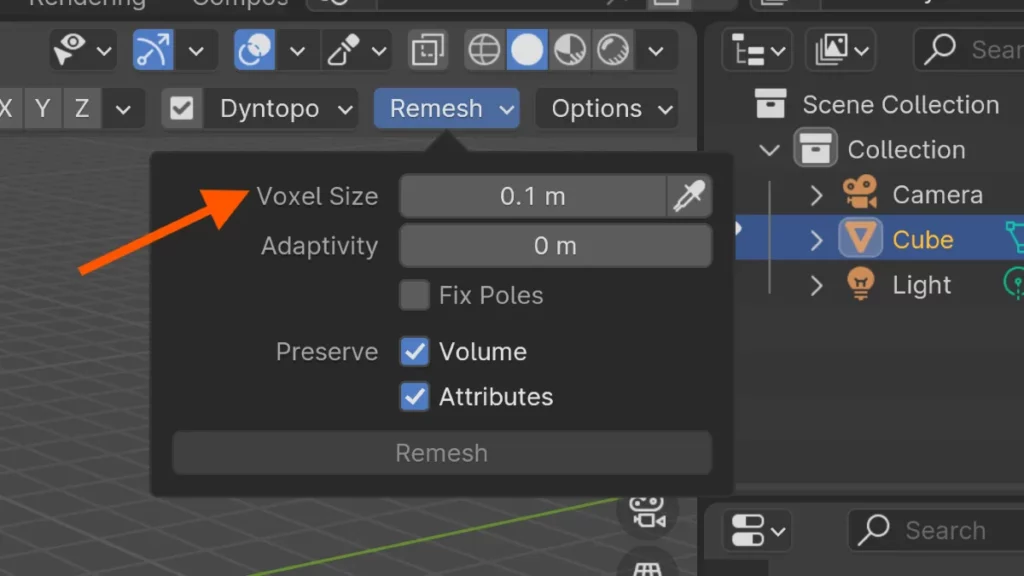
Balance is key in optimizing sculpt resolution. Too high a resolution may cause printing issues, while too low can lose detail. Find the sweet spot where your printer’s precision aligns with the sculpt’s complexity. This ensures a high-quality print without unnecessary complications.
Support structures play a role in print quality as well. Use them wisely to sustain the sculpt’s finer features. Position supports to minimize contact with detailed areas, preserving the sculpt’s resolution.
When you’re ready to export your model, choose the appropriate file format. Usually, STL files work best for 3D printing. Ensure the export settings reflect the optimized resolution of your sculpt.
Lastly, test your settings with a small print before committing to a full-scale model. This step can save time and materials if adjustments are needed. With these tips, you’ll be well-equipped to optimize sculpt resolution for print-perfect results. The next section will delve into the critical role of support structures and how to place them efficiently for immaculate prints.
The Backbone of a Successful Print: Designing Support Structures
Support structures for 3D printing are essential for creating complex shapes and overhangs. They act as scaffolding, holding parts in place during the printing process. Without them, certain designs would collapse or warp, leading to failed prints.
Designing optimal support structures for 3D printing requires understanding the balance between stability and material use. Too many supports can waste material and make post-processing a chore. Too few can risk the integrity of the print, especially for detailed sculpts.
When working in your 3D software, you can usually add supports manually or automatically. To add them manually, navigate to the Support section and select the appropriate tool. For automatic supports, use the Generate Supports function, which can save time and guesswork. Remember, the goal is to ensure your sculpt stands firm without excess material.
The next section will delve into the intricacies of resolution in 3D printing, guiding you through the steps to achieve the sharpest details for your print-perfect sculpts.
Detail vs. Durability: Finding the Balance for Perfect Prints
In the realm of 3D printing, the quest for achieving intricate details can often come at the expense of the object’s durability. Balancing detail and printability requires an understanding of how resolution settings and support structures impact the final product. High-resolution prints capture finer features but can lead to fragility if not managed correctly.
Choosing the right material is crucial for balancing detail and printability. Some materials offer high detail but may be too brittle for thin structures, while others provide strength but cannot render fine details. It’s essential to select a material that can support the intricacies of your design without compromising its structural integrity.
Adjusting print resolution is also a key factor in this balance. Use a higher resolution for detailed areas but consider lowering it for less intricate sections. This strategy not only saves printing time but also reduces the risk of breakage. To optimize these settings, go to the Print Setup menu and tweak the resolution sliders accordingly.
Supports play a pivotal role in maintaining both detail and durability. They provide stability during printing but must be placed thoughtfully to avoid obscuring details. Use software tools to customize supports, ensuring they are strong enough to hold the print but easy to remove. Access support settings by navigating to the Supports section of your slicing software.
Remember, balancing detail and printability is a dance of compromise. It takes practice to recognize when to prioritize one over the other. By mastering these techniques, you can create print-perfect sculpts that stand the test of time and admiration. The next section will guide you through optimizing your print orientation for the best results.
From Printer to Perfection: Post-Processing Techniques for Sculpts
Transforming a fresh print into a masterpiece involves a series of post-processing techniques. These methods refine both the aesthetic and structural integrity of your sculpted creations. By sanding down layer lines, you enhance the smoothness and ready the surface for further detailing.
Applying a primer is the next crucial step in post-processing techniques. This helps to reveal any remaining imperfections that need attention. Filler putty can then be used to address these flaws, ensuring a flawless base for painting.
Once the surface is smooth and primed, it’s time to bring your sculpt to life with paint. Use a combination of airbrushing and hand-painting to add depth and character to your piece. Seal your work with a clear coat to protect the paint and add a professional finish. This approach not only elevates the visual appeal but also fortifies the sculpt against handling and environmental factors.
Your post-processed sculpt is now ready to display or to undergo further customization, leading seamlessly into the next section on advanced finishing techniques.
Choosing the Right Material for Your Sculpt
Material considerations can make or break the quality of your 3D printed sculptures. The type of material you select dictates not only the appearance but also the strength and durability of your final print. Understanding the properties of various filaments and resins ensures you choose the right one for your project.
Certain materials are better suited for intricate details and require less post-processing. For example, if you aim for smooth surfaces and fine features, a high-quality resin might be your best choice. It captures the nuances of your design but often requires the use of a UV curing station.
If your sculpture will encounter frequent handling or outdoor conditions, consider tougher materials like ABS or PETG. These offer increased resistance to impact and wear, a crucial factor for functional pieces. Keep in mind, these materials might need additional ventilation during printing due to fumes.
Each material has its own set of printing parameters that influence the sculpture’s outcome. Adjusting the resolution and supports in your 3D printing software can help mitigate issues like warping or sagging. For instance, to join two objects together, use Ctrl + J. Go to the Object menu to locate the join tool.
After choosing your material, the next step is to fine-tune your printer settings. This will ensure your sculpture prints with the desired detail and strength. Moving to the next section, we’ll delve into optimizing these printer settings for the best results.
Ready, Set, Print: Preparing Your Sculpt Files for the 3D Printer
Preparing files for printing is crucial in ensuring that your 3D sculpture comes out flawlessly. Begin by choosing the right file format; formats like STL or OBJ are widely accepted and reliable. Confirm that your chosen software can export to these formats to make the process seamless.
Consider resolution settings next, since they can make or break your print. High resolution captures more detail but takes longer to print and uses more material. Adjust your model’s resolution within the software to balance detail with efficiency. Use options like Increase Mesh Resolution in the Mesh menu to refine your sculpt’s details.
Finally, software plays a vital role in preparing files for printing. Opt for software known for good slicing capabilities, like Cura or Simplify3D. They slice your model into layers for the printer to build upon and generate necessary support structures. To combine multiple sculpts, use the shortcut Ctrl + J. Check that all parts fit within your printer’s build volume through the Print Setup option before sending your file to print.
By meticulously preparing files for printing, you ensure a smoother printing experience and superior sculpt quality. Keep refining until your file meets both the technological needs and your personal standards for a print-perfect result.
BEGIN LEARNING AND DEVELOPING WITH OUR BLENDER VIDEO SCHOOL!!
Check out our course library if you are looking for a systematic and effective way to improve your skills as a 3D artist. Click Here To Learn Blender The Right Way!