Delving into the world of digital art and 3D modeling, Blender stands out as a powerful tool with a plethora of features for sculpting intricate designs. Its advanced sculpting brushes, going beyond the basics, are pivotal for artists aiming to create detailed and unique textures. Mastering these custom options elevates your modeling projects, allowing you to craft with the precision and creativity of a seasoned professional.
With Blender, mastery of custom sculpting brushes unlocks a realm of creative potential. It’s all about control, intricacy, and bringing your digital sculptures to life. This vital skill is essential for any 3D artist looking to refine their craft.
Yet, selecting the right brush from the extensive options available can be daunting. This is the first challenge users face when aiming to master custom sculpting brushes in Blender. It serves as a perfect segue into crafting your very first custom brush, setting the foundation for advanced sculpting expertise.
Creating Your First Custom Brush in Blender
Blender’s sculpting brushes offer a wide range of options for artists to create detailed and unique 3D models. However, sometimes the standard brushes may not be sufficient for your specific needs. In order to take your sculpting to the next level, it’s important to master customizing brushes in Blender.
To create your first custom brush in Blender, follow these steps:
Step 1: Access Brush Panel
- Action: Open Blender and select the Brush icon located in the toolbar on the left side of the screen.
S2: Choose Base Brush
- Action: In the Brush panel, scroll through and select the brush you want to use as your base.
S3: Adjust Base Brush Settings
- Action: Modify the settings of your chosen base brush to suit your preferences. You can change parameters like size, strength, and falloff.
S4: Create New Brush Slot
- Action: Click on the “+” icon next to the Brush menu to add a new brush slot.
S5: Copy Base Brush
- Action: In the new brush slot, open the dropdown menu under the brush thumbnail and select “Copy Brush” to duplicate your base brush.
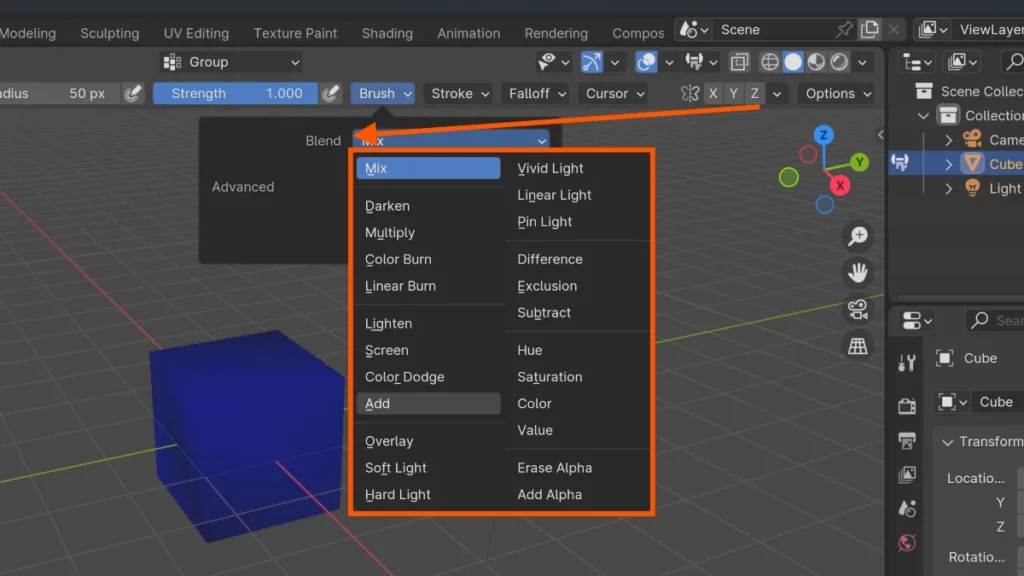
S6: Customize Duplicate Brush
- Action: Click on the brush thumbnail in the new slot to access its settings.
- Detail: Start modifying the duplicate brush’s settings to create your custom brush. You can alter the shape, texture, alpha, and other properties.
S7: Refine Your Custom Brush
- Action: Experiment with different settings and adjustments to achieve the desired effect for your custom brush.
S8: Save Your Custom Brush
- Action: To save your newly created custom brush, click on the “+” icon in the Brush panel again.
- Detail: Select “Save Brush”, name your brush, and it will be stored in your brush library for future use.
By creating custom brushes in Blender, you can enhance your sculpting workflow and bring your creative vision to life. Don’t be afraid to experiment with different settings and combinations to find the perfect brush for your projects.
Advanced Sculpting Techniques with Custom Brushes
Delving into advanced sculpting techniques in Blender opens up a realm of possibilities for artists and designers. One such technique involves the use of custom brushes, which can drastically enhance the detailing and texturing process. By mastering these tools, you can add complexity and realism to your 3D sculptures with precision and ease.
To begin, familiarize yourself with Blender’s Sculpt Mode, which offers a suite of brushes for various effects. Custom brushes can be created or imported to suit specific needs. Start by selecting a basic brush and then modify its properties in the Brush Settings. Here, you can adjust the shape, strength, and dynamics to craft a unique tool for your project.
Experiment with different stroke methods and falloff shapes to achieve the desired impact on your model. Use the Texture tab to apply custom textures to your brush, giving you the ability to sculpt with patterns or specific surface details. Remember to save your custom brushes for future use by hitting Ctrl + S. This ensures you can maintain consistency across different sculpting sessions.
Use Dynamic Topology
Advanced sculpting techniques in Blender also involve layering strokes and utilizing the Dyntopo feature for dynamic topology changes. This allows for adaptive mesh refinement where detail is needed the most. Toggle Dyntopo with Ctrl + D and refine your model as you sculpt, without worrying about the initial mesh density.
As you continue to explore sculpting techniques in Blender, you’ll find that custom brushes are integral to achieving high-quality results. They enable you to impart a signature touch to your creations, making them stand out. With practice, these advanced tools will become second nature, paving the way for even more intricate and detailed sculpting work. Next, we’ll look at how to optimize your workflow for faster and more efficient sculpting.
Mastering Texture Details: A Brush Approach
Texture Detailing Brushes in Blender are essential for artists aiming to enhance the realism of their sculptures. These specialized brushes allow you to add intricate surface details with precision. They are particularly useful when simulating textures like skin pores, cloth weave, or the fine scratches and imperfections found in worn materials.
To select a Texture Detailing Brush, press T to open the Tool Shelf, and click on the Sculpt tab. Here, you’ll find a variety of brushes designed for fine detailing. Experiment with brushes like the Clay Strips or Crease to understand how they affect your model’s surface. Remember, each brush has unique properties that can be adjusted to suit the texture you’re aiming to create.
Customizing Texture Detailing Brushes goes beyond selecting them from a list. Press F to adjust the brush size and Shift + F to modify its strength. For more refined control, delve into the brush settings panel. Here, you can tweak the brush’s texture, stroke method, and falloff to simulate the desired material properties. As you master these settings, you’ll find your sculptures taking on a life-like quality, with textures that truly stand out.
The next section will delve deeper into the nuances of brush settings, ensuring your Texture Detailing Brushes work seamlessly to create compelling and realistic textures in Blender.
Optimizing Your Workflow with Brush Presets
Customizing brush presets in Blender is a game-changer for artists looking to streamline their sculpting process. By setting up your own brush presets, you tailor your toolkit to suit your specific workflow needs. This customization allows for quick switching between your most-used brushes, saving precious time and keeping your focus on creating rather than searching for tools.
To begin brush presets optimization, start by adjusting an existing brush to your liking. You might alter its strength, size, or texture to match the effect you’re after. Once satisfied, save this configuration as a new preset by going to the Tool Settings panel and clicking on the Add Brush button. Name your new brush for easy identification later.
Remember, the key to brush presets optimization lies in accessibility. Assign shortcuts to your custom brushes for even faster selection. Use the Keymap in Blender’s preferences to set hotkeys. For instance, to assign a brush to F1, simply navigate to the keymap settings and link your brush to the desired key. This step ensures your favorite brushes are always just a keystroke away.
With your new presets saved and shortcuts assigned, you’ll see a significant improvement in your sculpting efficiency. The brushes you need are now readily available, allowing you to quickly execute ideas that come to mind. This optimization not only speeds up your workflow but also encourages experimentation with different brush effects, leading to more dynamic and textured creations.
Now that you understand how to enhance your sculpting workflow with brush presets optimization, let’s delve into the next crucial step: mastering the art of dynamic topology for intricate detail work.
Elevating Digital Artistry through Blender Customization
Blender’s versatile toolset takes digital artistry to new heights, allowing for unparalleled customization. One of the most powerful features lies in creating custom sculpting brushes. These personalized tools can transform a digital canvas, bringing precision and uniqueness to every stroke.
Artists often seek ways to make their workflow efficient, and Blender caters to this by facilitating quick brush creation. By accessing the Brush menu, artists can adjust settings to craft brushes that match their needs. Whether carving intricate details or broad textures, custom brushes ensure every artist’s touch is distinct.
Experimenting with Blender’s brush settings opens a realm of possibilities. Adjusting factors like strength, jitter, and falloff empowers artists to achieve the right effect for any project. With each parameter tailored, the brush becomes an extension of the artist’s vision, enhancing the digital artistry with Blender experience.
To add a new level of dynamics, artists use texture maps. They apply these maps onto brushes through the Texture tab, giving life to complex surfaces and organic patterns. Such textured brushes can mimic real-world materials, lending authenticity to digital sculptures.
Understanding Blender’s brush customization is crucial for artists aiming to refine their digital sculpts. With the right combination of settings, a brush can emulate traditional clay tools or innovate entirely new effects. This mastery of digital artistry with Blender equips creators to push the boundaries of their creativity.
This section leads into exploring how the integration of custom brushes improves workflow and artistic expression. Keep reading to discover tips for integrating custom brush techniques into your Blender projects.
Expanding Your Toolbox: Blender Brush Libraries
Exploring the vast array of Blender Brush Libraries can significantly enhance a sculptor’s creative workflow. The built-in Brush Library in Blender offers a range of textures and strokes, tailored to different sculpting needs. Whether carving intricate details or shaping broad surfaces, these libraries provide the tools necessary for artists to express their vision.
Customization is at the heart of Blender’s sculpting capabilities. Users can easily adjust settings within the Brush panel to fine-tune the behavior of each brush. Furthermore, importing external brush sets or creating personal libraries ensures that the right tool is always at hand. This flexibility allows sculptors to build up a personalized kit of brushes.
To expand your palette, engage with the online community of Blender artists. Blender Brush Libraries are frequently shared, offering a spectrum of unique brushes that can inspire and streamline your sculpting process. By integrating these custom libraries, artists can push the boundaries of their sculptural projects in Blender, forging new pathways for artistic expression.
BEGIN LEARNING AND DEVELOPING WITH OUR BLENDER VIDEO SCHOOL!!
Check out our course library if you are looking for a systematic and effective way to improve your skills as a 3D artist. Click Here To Learn Blender The Right Way!