Creating unforgettable creatures that captivate audiences involves blending art and imagination. The journey of Sculpting Creatures: From Concept to Final Model is traversed by artists and designers who translate sketches into breathtaking, tangible sculptures. This process demands a unique blend of creativity, skill, and technical prowess, which together bring mythical and fantastical beings to life in stunning detail and realism.
The Design Unforgettable Creatures – From Sketch to Sculpt is a transformative art. Artists embark on rendering creatures of myth into detailed sculptures. This journey turns a mere concept into a physical, awe-inspiring model.
Designing creatures poses the challenge of infusing originality into every creation. This obstacle paves the way for The Basics of Unforgettable Creature Design, where foundational strategies direct the path from mere ideas to captivating sculptural forms.
The Basics of Unforgettable Creature Design
Mastering creature design basics is the foundation of bringing your fantastical beings to life. Start with a strong concept. Focus on the anatomy, behavior, and environment of your creature to ensure a believable design.
Sketching is the first critical step in creature design basics. Use quick, loose drawings to explore shapes and postures. This process helps in developing a creature that is both original and memorable.
Once you’re happy with a sketch, refine it. Define the creature’s form and details, considering how light and shadow play on its surfaces. This will prepare you for the next stage: sculpting.
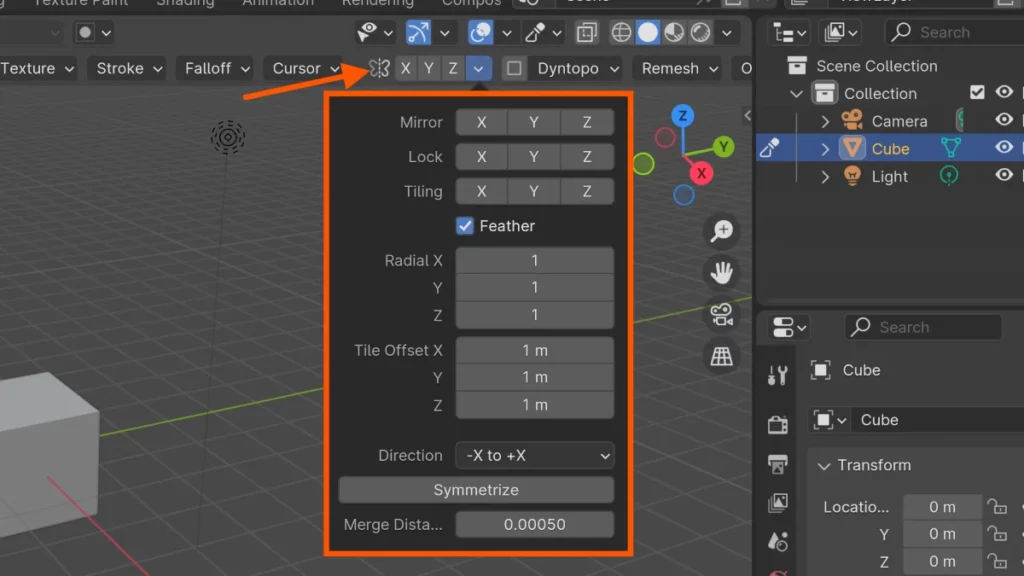
In sculpting, creature design basics take on a three-dimensional form. Begin by blocking out the basic shapes in your digital sculpting software. Use symmetry tools to maintain consistency.
Pay attention to the creature’s textures and fine details as you sculpt. Use a variety of brushes and stamping tools to add realism and depth to the design. Remember, the goal is to create something unforgettable.
At this point, you should have a solid understanding of creature design basics. These fundamentals will carry you through to the next phase of adding color and texture, bringing your creature fully to life.
Transforming Sketches into 3D Creature Sculpts
The journey from sketch to 3D sculpt is a transformative process that breathes life into creature designs. Initially, artists must translate the two-dimensional ideas into a workable 3D form. This step requires a keen understanding of anatomy, perspective, and volume to ensure the creature’s structure is believable.
Once the basic shape is established, the next phase in from sketch to 3D sculpt involves refining the creature’s silhouette. Artists often use sculpting tools within their chosen 3D software to add muscles, bones, and other anatomical details. These tools allow for dynamic adjustments, making it easier to match the original concept art.
Detailing is where from sketch to 3D sculpt truly shines, as textures bring the creature to life. Techniques such as bump mapping and texturing are applied to create skin, fur, scales, or any other surface detail. For intricate tasks, shortcuts like Ctrl + T can prove invaluable for quick transformations. The goal is to capture not just the form, but the essence of the creature, ensuring each scale or tuft of fur adds to its story.
As the creature’s form takes shape, artists must constantly compare the 3D model to the original sketch. This comparison ensures the final sculpt remains true to the envisioned design. By toggling between views, artists can utilize tools from the viewport to scrutinize every angle and detail.
The transition from sketch to 3D sculpt culminates in a creature ready for rigging and animation, moving the project into its next exciting phase. This sculpt will serve as the foundation for movements that will bring the creature into full realization within its digital world.
Advanced Texturing and Detailing for Creature Sculpting
Texturing and detailing creatures is a pivotal step in transforming a simple sculpt into a lifelike entity. It involves using a variety of brushes and techniques to add depth, complexity, and realism to the creature’s surface. This process takes your creation from a concept to a creature that appears as though it could leap off the screen.
To begin texturing in your digital sculpting software, select the appropriate brush and set the strength to a level that suits the detail you’re aiming for. Use Alt to toggle between adding and subtracting texture, allowing you to create intricate patterns and features. For scales, wrinkles, or scars, utilize alphas and stencils to stamp or stencil these details onto your creature with precision.
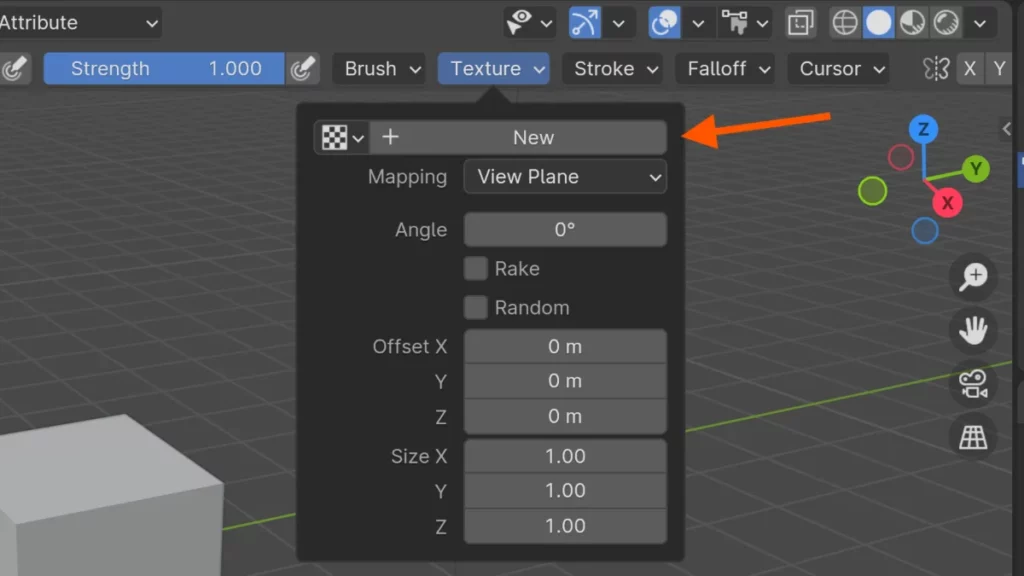
Refining the creature’s skin might require specific sculpting brushes or tools found within your software. Navigate to the Texture menu to find tools that can mimic natural surfaces. Adjust the settings for each brush to vary the intensity and scale of the texture. Remember, pressing Shift while sculpting will smooth out any overly harsh textures, blending them seamlessly into the surrounding areas.
As you detail your creature, keep in mind the anatomy and how different textures might reflect the creature’s environment or lifestyle. The detailing process should narrate the creature’s history, suggesting wear and tear or a sleek, well-camouflaged hide. Texturing and detailing creatures is not just about aesthetics; it’s about storytelling through visual cues.
After you have textured and detailed your creature, the next step is to breathe color into your creation. This introduces another layer of depth and authenticity, further enhancing the lifelike quality of your sculpt. Stay tuned for insights on how to paint your creature with dynamic and realistic colors.
Considering Anatomy in Creature Design
Anatomical considerations form the bedrock of believability. A thorough understanding of how anatomy works ensures that your creations, no matter how fantastical, maintain a sense of realism that viewers instinctively look for. Creature Anatomy Considerations must integrate seamlessly with the imaginative aspects of your design to yield a creature that feels both novel and viable.
To achieve this, study a wide range of existing animal anatomy. Look at how muscles connect to bone, how joints allow for movement, and how different creatures are adapted to their environments. When you apply these Creature Anatomy Considerations to your own designs, you create a framework that supports and enhances the unique features of your creature, making it feel like a living, breathing entity.
Remember to maintain proportion and balance in your creature’s form. A disproportionate limb or an awkwardly placed joint can quickly shatter the illusion of life. Use the Transform tool to tweak your creature’s anatomy, ensuring that each part contributes to a harmonious and functional whole. This attention to anatomical detail will make your creature unforgettable, as it will stand up to both artistic scrutiny and the subconscious checks we all use to assess the creatures we encounter, real or imagined.
As you finalize your creature’s anatomy, consider how it would move and interact with its environment. This dynamic aspect of Creature Anatomy Considerations will inform your sculpting process, imbuing your creation with the essence of life. The next section will delve into the techniques that bring your sculpted creature to life, transforming it from a static figure into a character with a story.
The Best Digital Tools for Creature Sculpting
Crafting realistic or fantastical creatures requires a toolkit that can handle intricate details and organic shapes. Digital Sculpting Tools for Creatures offer artists unparalleled flexibility and precision. Among the top tools for this purpose is ZBrush, a staple in the industry known for its robust feature set.
ZBrush’s brushes and Dynamesh technology allow sculptors to mold their creations as if working with digital clay. With tools like Clay Buildup and Dam Standard, artists can add texture and fine details. Press Shift to smooth edges or hold Alt for carving into the surface. These techniques make ZBrush one of the most powerful Digital Sculpting Tools for Creatures available.
Another excellent choice is Blender, which is not only free but also boasts a comprehensive suite of sculpting features. Blender’s constantly evolving toolset includes features like Dynamic Topology, which refines the mesh as you sculpt. Use G to grab and move elements, or hit Ctrl + T to tweak the topology for smoother transitions. Sculptors find Blender to be a flexible and cost-effective option for bringing creatures to life.
Transitioning from sketch to sculpt can be seamless with these powerful applications. Whether opting for the industry-leading capabilities of ZBrush or the open-source versatility of Blender, artists have the digital sculpting tools they need to create memorable creatures. Each software brings unique strengths to the table, empowering sculptors to push the limits of their imagination. The next step after choosing the right tool is to understand the workflow that can turn a simple sketch into a three-dimensional masterpiece.
How to Bring Your Creature Sculpts to Life with Color
Bringing creatures to life with color is a pivotal step in creature design. Start by choosing a base color that reflects your creature’s environment or character traits. Consider how light interacts with the skin, and apply a gradient or varied tones to mimic this effect.
Texture plays a significant role in color application. Use a texturing brush to layer colors and build depth. Think about the creature’s habitat and lifestyle to decide where to add roughness or smoothness.
Detailing with color adds personality and realism to your creature sculpts. Focus on the eyes, mouth, and other key features to make them pop. Use lighter shades to highlight areas that would naturally catch the light.
Accent hues can give your creature an otherworldly appeal. Apply subtle splashes of unexpected color for a striking effect. Strategically placed, these hues will draw the viewer’s eye and emphasize the creature’s unique qualities.
To blend colors seamlessly, use the Alt key to pick intermediate shades. This helps to create a natural transition between colors and enhances the overall look of the creature. Use bold highlights and deep shadows to convey volume and shape.
Bringing creatures to life with color demands an understanding of the emotional impact of hues. Select a color palette that conveys the mood or story behind the creature. Warmer colors might suggest a fiery temperament, while cooler tones could hint at a calmer nature.
Remember that less is often more. Avoid over-saturating your sculpture with too many colors, as this can detract from its believability. Instead, aim for a harmonious balance that supports the design and breathes life into your creation.
BEGIN LEARNING AND DEVELOPING WITH OUR BLENDER VIDEO SCHOOL!!
Check out our course library if you are looking for a systematic and effective way to improve your skills as a 3D artist. Click Here To Learn Blender The Right Way!