Sculpting for Beginners: Troubleshooting Common Mistakes can be a pivotal guide for newcomers attempting to master the art of modeling. Acquiring the skill involves overcoming hurdles that can turn an enthusiastic start into a frustrating endeavor. Understanding the common pitfalls and learning how to swiftly correct them is essential for any aspiring sculptor.
Avoiding sculpting mistakes is crucial to quickly fixing your models. Pay close attention to proportion, symmetry, and tool usage. Effective strategies exist to correct errors efficiently, improving your sculpting results.
Coping with the frustration of errors can be a significant hurdle when trying to Avoid These Sculpting Mistakes – Fix Your Models Fast. This challenge sets the stage for delving deeper into the Top Common Sculpting Mistakes and How to Avoid Them, ensuring that your next project advances smoothly from the start.
Top Common Sculpting Mistakes and How to Avoid Them
| Mistake | Description | How to Avoid |
|---|---|---|
| Overworking the Sculpture | Working on a sculpture too long can lead to losing the original vision and overworking details. | Take breaks and step away to gain a fresh perspective. |
| Ignoring Proportions | Neglecting proportions can disrupt the balance and realism of the sculpture. | Use reference images or measurements to maintain accuracy. |
| Lack of Planning | Starting without a clear plan can lead to aimless sculpting and unsatisfactory results. | Create sketches or mood boards to focus your approach. |
| Rushing the Details | Focusing on intricate details before establishing basic forms can result in a messy sculpture. | Block out main shapes first, then gradually add details. |
| Neglecting Texture and Surface | Overlooking texture and surface finish can make a sculpture appear flat and unfinished. | Experiment with different techniques and tools for texture. |
By being mindful of these common sculpting mistakes and implementing the suggested solutions, you can improve the quality and overall appearance of your models.
Correcting Proportional Mistakes in Your Sculptures
Fixing proportional mistakes in your sculptures is crucial for a lifelike representation. Start by assessing the entire sculpture from different angles. This allows you to spot areas that may need resizing or reshaping.
Use tools like calipers to measure and compare different parts of your sculpture. Digital sculptors can rely on the Transform tool to adjust proportions accurately. Traditional sculptors should mark measurements directly on the material.
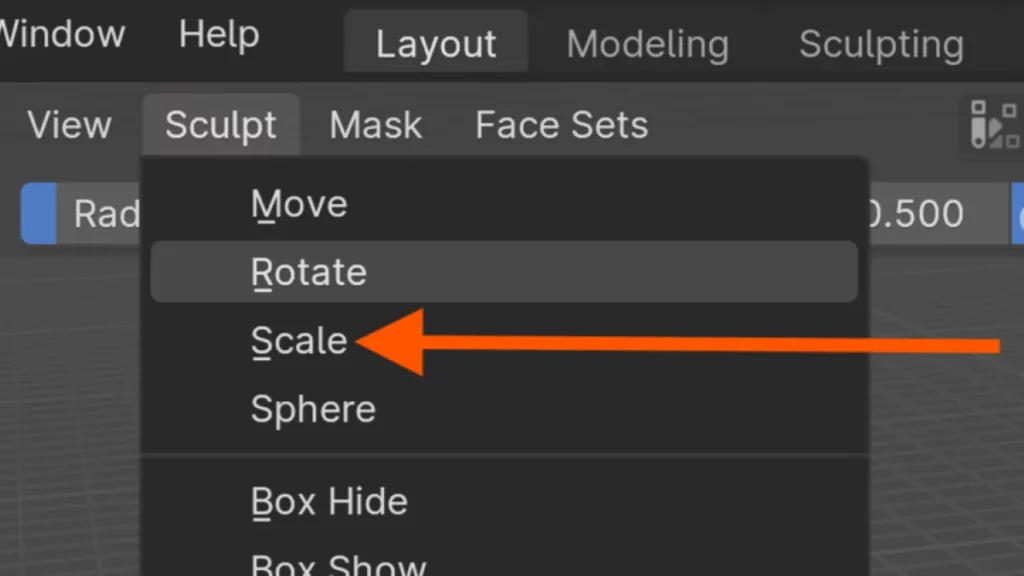
If you find a discrepancy, don’t hesitate to make changes. For digital sculptors, use the Scale function, often accessed with the S key, to adjust the size of selected areas. In clay or other malleable materials, add or remove material as needed to correct the proportions.
Remember, fixing proportional mistakes early can save you time. Revisit the Reference images often to ensure accuracy. Adjustments might seem minor, but they greatly impact the sculpture’s overall realism.
Once you’ve made adjustments, review your work again. Continual refinement helps you achieve a balanced and proportionate sculpture. If necessary, use the Undo feature, typically activated with Ctrl + Z, to revert changes and try a different approach.
After fixing proportional mistakes, your sculpture should start to look more cohesive. Keep refining and adjusting as you move on to the next stage of detailing, which will further enhance the realism of your artwork.
Mastering Smoothing Techniques for Flawless Surfaces
Achieving a smooth surface on your sculptures is a crucial step in creating a professional-looking model. One effective smoothing technique involves the use of tools like the rake or loop tools, which help in evening out the surface. Apply gentle, consistent strokes across the material to gradually refine the surface without removing too much material.
Another vital smoothing technique is to employ various grades of sandpaper or sculpting sponges. Start with a coarser grit to remove larger imperfections, then shift to finer grits for a polished finish. Remember, patience is key; rushing the smoothing process can result in an uneven surface that detracts from the overall appearance of your sculpture.
For digital sculptors, software tools offer a wide range of smoothing techniques that can be applied with precision. Utilize the Smooth brush in your digital sculpting program, which can be selected with a quick hotkey such as Shift. Smooth out the rough areas with light pressure on your stylus or mouse, gradually building up to the desired level of smoothness. This method allows for an intuitive and controllable approach to refining your digital models.
With these smoothing techniques, you can enhance the quality of your sculptures and correct mistakes quickly. Remember to work incrementally and assess your progress frequently. The next section will delve into the importance of symmetry in your models and how to maintain it throughout the sculpting process.
Detailing Mistakes: Finding the Balance in Sculpting
Achieving the right level of detail in sculpting is a delicate art. Too often, artists fall into the trap of over-detailing, creating a cluttered and chaotic model. Conversely, under-detailing can leave a sculpture feeling unfinished and lacking depth.
A common detailing mistake is neglecting scale and proportion. Artists should ensure details are appropriately sized for the model. This error can be avoided by frequently stepping back to review the work as a whole. Use the Z key to toggle wireframe view, which helps in assessing the proportionality of details.
Another pitfall is inconsistent texturing. When sculpting, strive for a cohesive texture throughout your model. Focus on how light interacts with the surface, and use the Shading option in the Object menu to check for consistency. Remember, varying the pressure with your sculpting tool can add realism without overcomplicating the texture.
Lastly, don’t ignore the importance of focal points. Details should guide the viewer’s eye to areas of interest, not distract. Utilize tools like the Mask and Inflate in the Tool palette to sharpen these areas subtly. This technique helps maintain a balance and ensures that your detailing enhances, rather than overwhelms, your sculpt.
These detailing mistakes, when addressed, can significantly improve the quality of your sculptures. Keep these tips in mind, and you’ll find that your models will start to hold the gaze with a compelling and balanced presentation. Moving forward, we’ll dive into how to refine your detailing techniques to achieve an even greater level of realism.
Optimizing Your Sculpting Workflow for Better Results
Workflow optimization is crucial for sculptors seeking to improve their sculpting efficiency and quality. One technique that can speed up your process is customizing your toolset. Make sure every tool you frequently use is within easy reach; this reduces the time spent searching and allows for a more intuitive sculpting experience.
Another aspect of workflow optimization involves mastering keyboard shortcuts. For instance, to quickly merge two objects, press Ctrl + J. Memorizing these shortcuts can significantly cut down on the time taken to perform repetitive tasks, allowing you to remain focused on the creative aspects of sculpting.
Consistency in your workflow is also key. Establish a routine sequence of steps for tasks like saving versions, organizing layers, or applying textures. This consistency saves time and diminishes the likelihood of errors or omissions. Utilize the Object menu and layers panel effectively to keep your workspace orderly and your workflow streamlined.
In the quest for workflow optimization, never underestimate the power of a well-organized digital workspace. Set aside time to customize your interface, tailoring it to your unique sculpting methods. Place essential panels and toolbars where they feel most natural, reducing strain and improving the speed of your sculpting.
By integrating these workflow optimization strategies into your routine, you can dedicate more time to refining your sculptures and less time grappling with inefficiencies. With your newfound knowledge, it’s time to dive into the next section: sculpting mistakes to avoid and how to correct them swiftly.
The Art of Review and Revision: Perfecting Your Sculpt
Sculpting is an iterative process demanding consistent review and revision. Whether you’re working with digital tools or clay, the review and revision processes are critical for refining your art. Jump back frequently to assess the proportion, symmetry, and detail of your sculpt.
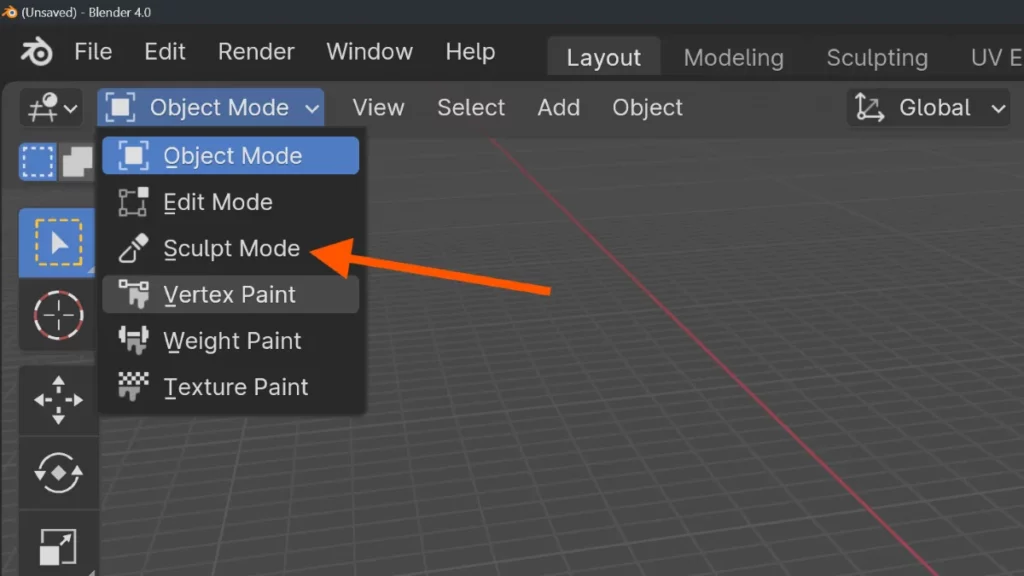
Recognize weak points by switching angles and using your software’s review tools. For instance, in Blender, use the View menu to check your model from different perspectives. Rotate around your sculpt, look from top to bottom, and even use mirrored views to catch flaws.
During the revision phase, focus on the broader shape before tackling details. Use the Sculpt Mode in Blender to smooth out larger areas, then zoom in to refine. Remember, the review and revision processes are not just about finding errors, but enhancing what’s already good.
Restructure your model quickly with keyboard shortcuts. To merge objects, press Ctrl + J. If you need to remove parts, select them and hit X. These shortcuts expedite the review and revision processes, keeping your workflow efficient.
Embrace critiques from peers as part of the review and revision processes. Fresh eyes can spot issues you’ve overlooked, providing valuable feedback for your sculpting project. Such input is indispensable for growth and skill development in sculpting.
BEGIN LEARNING AND DEVELOPING WITH OUR BLENDER VIDEO SCHOOL!!
Check out our course library if you are looking for a systematic and effective way to improve your skills as a 3D artist. Click Here To Learn Blender The Right Way!